
Long and short stitch.
This stitch I avoided for quite awhile
when I was learning to embroider. I thought it was too slow and
didn’t understand how to handle it so it looked reasonable.
when I was learning to embroider. I thought it was too slow and
didn’t understand how to handle it so it looked reasonable.
There was a period I didn’t even like how it looked.
I just didn’t want to do it.
But somewhere my attitude change, I was suddenly interested in thread painting, which
uses long and short stitch extensively.
uses long and short stitch extensively.
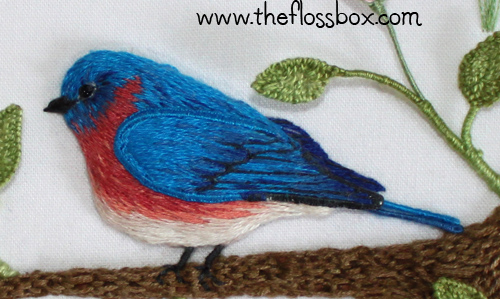
I got a couple books about thread
painting and gave it a try. The shading is subtle and felt overwhelming, but I got the hang of
the stitch and how to handle the threads, and I enjoyed the projects I made.
painting and gave it a try. The shading is subtle and felt overwhelming, but I got the hang of
the stitch and how to handle the threads, and I enjoyed the projects I made.
 |
| Design by Trish Burr |
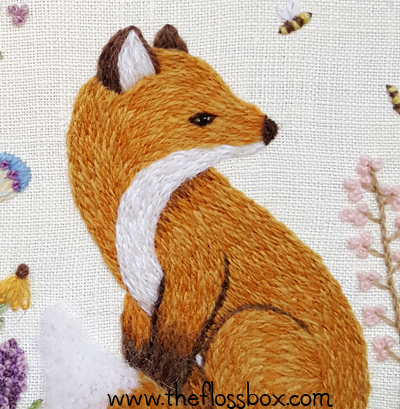
The mechanics I learned from the
thread painting, and the stitch found it’s way into some projects but
I never felt especially comfortable or good at it.
thread painting, and the stitch found it’s way into some projects but
I never felt especially comfortable or good at it.
Today, I am starting again to seek out
projects that use it in order to step outside my comfort zone and
hopefully improve.
projects that use it in order to step outside my comfort zone and
hopefully improve.
So what’s the best way to approach this
stitch?
stitch?
There are two key things to keep in
mind. First, it’s just a series of straight stitches that need to
be lined up in a varied manner, and second, the stitches are easiest to handle when worked in rows over the area to be filled.
mind. First, it’s just a series of straight stitches that need to
be lined up in a varied manner, and second, the stitches are easiest to handle when worked in rows over the area to be filled.
Many crewel and thread painting
instructions first say to outline the stitched area with split
stitch. This is a good habit as a gives a nice edge to the work, but
it’s not absolutely required, and there may be places where you
prefer that it isn’t there.
instructions first say to outline the stitched area with split
stitch. This is a good habit as a gives a nice edge to the work, but
it’s not absolutely required, and there may be places where you
prefer that it isn’t there.
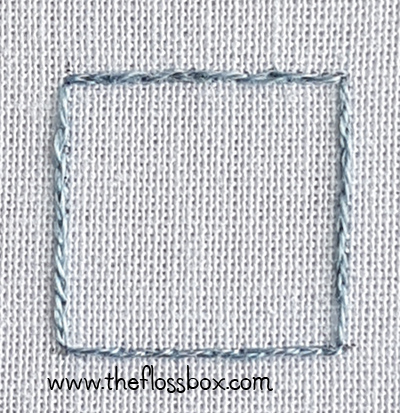
Next start with the first row.
Remember to vary the end points of the stitch. The stitches are very
regular and as uniform as I could manage.
Remember to vary the end points of the stitch. The stitches are very
regular and as uniform as I could manage.

Then begin the second row. For this
you will start your stitch somewhere in stitches of the row below.
Remember to vary the starting point as you work across the row, and
as above, be sure to vary the end points of each stitch
you will start your stitch somewhere in stitches of the row below.
Remember to vary the starting point as you work across the row, and
as above, be sure to vary the end points of each stitch
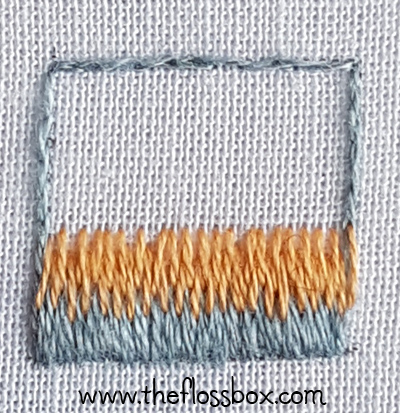
Make another row the same way, and so
on until the area is stitched.
on until the area is stitched.

A couple of final notes, this sample is
done with one strand of embroidery floss like many thread painting
projects, but you can use as many as you like. It will change the
look, but more on this later in the series.
done with one strand of embroidery floss like many thread painting
projects, but you can use as many as you like. It will change the
look, but more on this later in the series.
This is only a sample, my stitches in
my projects are never so nicely arranged as this, ao this later as well.
my projects are never so nicely arranged as this, ao this later as well.